
Azure AKS를 이용한 쿠버네티스 구축
ACR 내부에서 이미지 빌드 해보기
지난편(AZURE CLI로 Container Registry 만들기 )에서 우리는 Azure에 컨테이너저장소(Azure Container Registry)를 구축해봤었다.
다음과 같은 명령으로 확인할 수 있다.
az acr repository list --name xxxcontainerregistry --output table

az acr repository show-tags --name xxxcontainerregistry --repository iiswindowsservercore --output table
그런데, 로컬에서 docker로 이미지를 build하고 저장소로 push하지 않고도 az acr 명령어와 docker파일만 가지고 ACR 내부에서 빌드되어 push되는 편리한 기능을 사용할 수 있다.
ACR내부에서 이미지가 빌드될 때 사용하는 DockerFile을 만들어 본다. 단순히 IIS 설치하고 hello world를 출력하는 index.html 파일을 만드는 간단한 기능을 한다.
사용자 PC의 특정위치에 Dockerfile을 생성한다.
예) C:\sample\v2.0\Dockefile
# Sample Dockerfile

# Indicates that the windowsservercore image will be used as the base image.
FROM mcr.microsoft.com/windows/servercore:ltsc2019
SHELL ["powershell", "-Command", "$ErrorActionPreference = 'Stop'; $ProgressPreference = 'SilentlyContinue';"]

# Metadata indicating an image maintainer.
LABEL maintainer="syndy123@naver.com"

# Uses dism.exe to install the IIS role.
RUN dism.exe /online /enable-feature /all /featurename:iis-webserver /NoRestart

# Creates an HTML file and adds content to this file.
RUN echo "Hello World - Dockerfile" > c:\inetpub\wwwroot\index.html

#EXPOSE 80 을 넣어 주면 다른 컨테이너와 80포트에서 충돌이 난다. 그래서 이부분은 빼줘야한다.
#EXPOSE 80

#아래 구문 중요하다. 아래 구문을 넣어서 컨테이너가 올라오자마자 종료되는 문제를 방지해야한다. 이걸 넣지 않으면 State:Waiting ,  Reason:CrashLoopBackOff 상태로 컨테이너가 올라오지 않는다.
RUN powershell -Command Invoke-WebRequest -Uri https://dotnetbinaries.blob.core.windows.net/servicemonitor/2.0.1.6/ServiceMonitor.exe -OutFile C:\ServiceMonitor.exe
ENTRYPOINT ["C:\\ServiceMonitor.exe", "w3svc"]
다음명령을 실행하면 자동으로 Dockerfile로부터 이미지를 생성해 ACR로 Push까지 해준다. 참 편리하네~
#Dockerfile이 위치한 곳 예)C:\sample을 지정하여 다음명령을 실행한다.
#--platform Windows/amd64 옵션을 지정하지 않으면 기본적으로 linux용으로 빌드하므로 에러가나니 주의하자.
#Dockerfile을 수정해서 버전별로 관리하고 버전별로 빌드할 수도 있다.
#v1.0
#az acr build --registry xxxcontainerregistry --platform Windows/amd64 --image hello-world:v1.0 C:\sample\v1.0

#우리는 C:\sample\v2.0 폴더 하위에 있는 Dockerfile을 활용할 것이다.
az acr build --registry xxxcontainerregistry --platform Windows/amd64 --image hello-world:v2.0 C:\sample\v2.0
다음명령을 실행하여 생성된 이미지를 확인해 보자. 태그가 다른 두개의 이미지가 생성되어 있다.
az acr repository show-tags -n xxxcontainerregistry --repository hello-world
결과
[
  "v1.0",
  "v2.0"
]
ACR과 연결된 AKS 구축
이제 이 Azure Container Registry(ACR)와 연결된 Azure Kubernetes Service(AKS)를 구축해보려고 한다.
좀 전에 ACR에서 작성한 컨테이너 이미지는 AKS에서 작성한 쿠버네티스 클러스터상에서 pull하여 움직이게 된다. 그러기 위해서는 ACR과 AKS 사이에 인증을 해야하기 때문에 Azure Active Directory의 서비스 프린서플(principal)을 사용해야한다. 서비스 프린서플이란 Azure의 리소스를 조작하는 애플리케션을 위한 ID이다.
먼저 변수를 설정해 보자.
#ACR 이름 설정
$ACR_NAME = "xxxcontainerregistry"

# $ACR_NAME의 리소스 ID를 $ACR_ID에 설정한다.
$ACR_ID = (az acr show --name $ACR_NAME --query id --out tsv)

#서비스 프린서플 이름을 $SP_NAME에 설정
$SP_NAME = "xxx-acr-service-principal"

#AKS에서 작성한 쿠버네티스 클러스터가 ACR에 저장되어 있는 컨테이너 이미지에 엑세스 하기위해서는 ACR로부터 이미지를 취득하기 위한 적절한 권한을 AKS의 서비스 프린서플에 부여할 필요가 있다. 서비스프린서플을 작성하려면 az ad sp create-for-rbac 명령을 실행하면 되고, 여기서는 $ACR_ID로 지정한 ACR의 리소스 ID에 대해 읽기전용 권한을 부여하고 있다. 또 서비스 프린서플의 비밀번호를 나중에 사용하므로 $SP_PASSWD에 정하고 있다.
$SP_PASSWD=(az ad sp create-for-rbac --name $SP_NAME --role Reader --scopes $ACR_ID --query password --output tsv)

#작성한 서비스프린서플의 ID를 $APP_ID에 설정
$APP_ID = (az ad sp show --id "http://$SP_NAME" --query appId --output tsv)
한번 서비스프린서플의 ID와 PASSWD를 확인해 보자
PS C:\> echo $APP_ID
PS C:\> echo $SP_PASSWD
다음과 같은 형식으로 생긴 값이 출력된다.
x96xxx9-3x45-4xx3-908x-xxx3x47x81xx
xa8x181x-1x0x-48xx-xx5x-013x6xx181x7
쿠버네티스 클러스터를 생성하기 전 다음과 같이 aks-preview extension을 먼저 설치해준다.
# Install the aks-preview extension
az extension add --name aks-preview

# Update the extension to make sure you have the latest version installed
az extension update --name aks-preview

az feature register --name WindowsPreview --namespace Microsoft.ContainerService

az provider register --namespace Microsoft.ContainerService
이제 쿠버네티스 클러스터를 생성해 본다.
# Create an AKS cluster
# 클러스터 이름
$AKS_CLUSTER_NAME = "AKSCluster"
# 리소스그룹
$AKS_RES_GROUP = "xxxTest"
# 윈도우 노드가 추가됬을때 관리자 이름
$USERNAME_WIN="shw"
# 윈도우 노드가 추가됬을때 관리자 비번
$PASSWORD_WIN="*AbciteogheFfi*ehg" #패스워드 정책이 강화되었다 작성에 유의하자 P@ssw0rd 이런건 허용하지 않고 13자리 이상이어야 한다.

# 쿠버네티스 클러스터를 생성 마지막의 --service-principal 옵션과 --client-secret 옵션을 이용해 ACR과 연결되게 설정된다.
az aks create `
    --resource-group $AKS_RES_GROUP `
    --name $AKS_CLUSTER_NAME `
    --node-count 1 `
    --node-vm-size Standard_A2_v2 `
    --enable-addons monitoring `
    --kubernetes-version 1.18.14 `
    --generate-ssh-keys `
    --windows-admin-password $PASSWORD_WIN `
    --windows-admin-username $USERNAME_WIN `
    --vm-set-type VirtualMachineScaleSets `
    --load-balancer-sku standard `
    --network-plugin azure `
    --service-principal $APP_ID `
    --client-secret $SP_PASSWD


# Add a Windows Server node pool
az aks nodepool add `
    --resource-group $AKS_RES_GROUP `
    --cluster-name $AKS_CLUSTER_NAME `
    --os-type Windows `
    --name winnod `
    --node-count 1 `
    --node-vm-size Standard_A2_v2 `
    --kubernetes-version 1.18.14
클러스터가 생성되었으니 kubectl 명령을 사용해보자
PS C:\> az aks install-cli
#현재세션의 파워셀에서 다음 명령 실행
$env:path += 'C:\Users\<사용자>\.azure-kubectl'
#환경변수의 시스템변수 Path에 C:\Users\<사용자>\.azure-kubectl 추가해야함.

PS C:\> az aks get-credentials -g $AKS_RES_GROUP -n $AKS_CLUSTER_NAME
PS C:\> kubectl get nodes
# 다음과 같이 나오면 정상임
# aks-nodepool1-20397519-vmss000000   Ready    agent   18m    v1.13.12
# akswinnod000000                     Ready    agent   4m3s   v1.13.12
# akswinnod000001                     Ready    agent   4m7s   v1.13.12
윈도우 노드에 RDP로 접속
-o 옵션을 줘 좀 더 자세히 보자
PS C:\Users\poscoenc> kubectl get nodes -o wide

NAME                                STATUS   ROLES   AGE     VERSION    INTERNAL-IP   EXTERNAL-IP   OS-IMAGE                         KERNEL-VERSION      CONTAINER-RUNTIME
aks-nodepool1-20397519-vmss000000   Ready    agent   8h      v1.13.12   10.240.0.4    <none>        Ubuntu 16.04.6 LTS               4.15.0-1061-azure   docker://3.0.7
akswinnod000000                     Ready    agent   7h55m   v1.13.12   10.240.0.35   <none>        Windows Server 2019 Datacenter   10.0.17763.737
                                    docker://19.3.2
akswinnod000001                     Ready    agent   7h55m   v1.13.12   10.240.0.66   <none>        Windows Server 2019 Datacenter   10.0.17763.737
                                    docker://19.3.2
결과에서 보는 바와 같이 INTERNAL-IP 에 사설IP가 할당되어 있다.
AKS 클러스터의 Windows Server 노드에는 외부에서 액세스할 수 있는 공용 IP 주소가 아닌 사설 IP 주소가 할당되어 있다.따라서 RDP 연결을 만들려면 공개적으로 액세스할 수 있는 공용 IP 주소를 사용 하는 가상 컴퓨터를 Windows Server 노드와 동일한 서브넷에 배포해야 한다.
다음 명령에서 myvm 이라는 가상 머신을 만들고, 클러스터된 노드들의 RDP 허용을 위한 NSG 규칙 생성했다.
$CLUSTER_RG=(az aks show -g $AKS_RES_GROUP -n $AKS_CLUSTER_NAME --query nodeResourceGroup -o tsv)

$VNET_NAME=$(az network vnet list -g $CLUSTER_RG --query [0].name -o tsv)
$SUBNET_NAME=$(az network vnet subnet list -g $CLUSTER_RG --vnet-name $VNET_NAME --query [0].name -o tsv)
$SUBNET_ID=$(az network vnet subnet show -g $CLUSTER_RG --vnet-name $VNET_NAME --name $SUBNET_NAME --query id -o tsv)

#가상머신 생성
az vm create `
     --resource-group $AKS_RES_GROUP `
     --name myVM `
     --image win2019datacenter `
     --admin-username azureuser `
     --admin-password myP@ssw0rd12 `
     --subnet $SUBNET_ID `
     --query publicIpAddress -o tsv

#RDP 허용을 위한 NSG 규칙 생성
$NSG_NAME=$(az network nsg list -g $CLUSTER_RG --query [].name -o tsv)
az network nsg rule create --name RDPAccess --resource-group $CLUSTER_RG --nsg-name $NSG_NAME --priority 100 --destination-port-range 3389 --protocol Tcp --description "RDP access to Windows nodes"
이명령을 실행하고 나서 myvm 가상 머신에 RDP 로 접근할 수 있고 myvm 가상머신 내에서 RDP를 통해 10.240.0.35 , 10.240.0.66 윈도우 노드로 원격 접속이 가능하다.
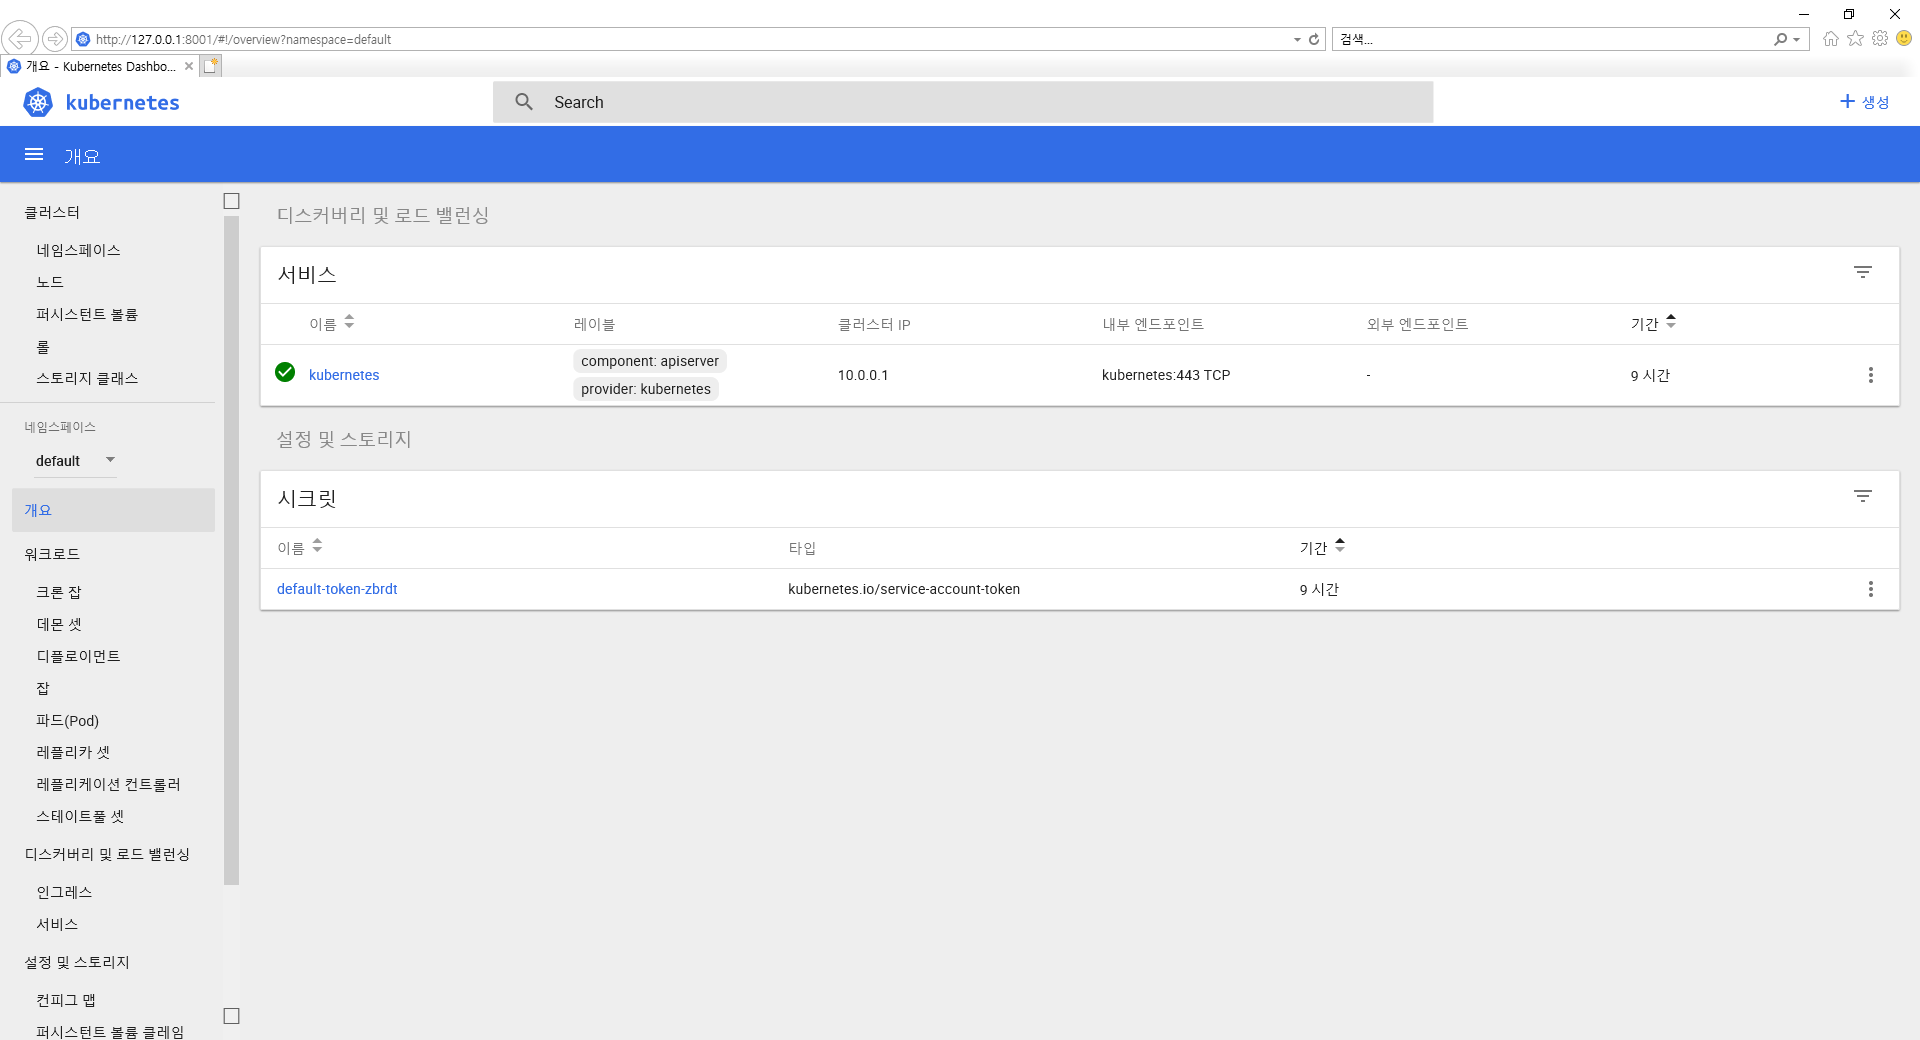
대쉬보드 사용하기
#AKS 클러스터에서 RBAC를 사용하는 경우, 대시보드에 올바르게 액세스하려면 먼저 ClusterRoleBinding을 만들어야 한다.
kubectl create clusterrolebinding kubernetes-dashboard --clusterrole=cluster-admin --serviceaccount=kube-system:kubernetes-dashboard

#대쉬보드 열기
az aks browse --resource-group $AKS_RES_GROUP --name $AKS_CLUSTER_NAME
쿠버네티스에 배포하기 위한 yaml 파일 만들기
사용자 PC의 특정위치에 yaml파일을 만든다.
예) C:\sample\v2.0\hello-world.yaml
apiVersion: apps/v1
kind: Deployment
metadata:
  name: hello-world
  labels:
    app: hello-world
spec:
  replicas: 1 #생성될 replicas
  template:
    metadata:
      name: hello-world
      labels:
        app: hello-world
    spec:
      nodeSelector:
        "beta.kubernetes.io/os": windows
      containers:
      - name: hello-world
        image: xxxcontainerregistry.azurecr.io/hello-world:v2.0
        resources:
          limits:
            cpu: 1
            memory: 800M
          requests:
            cpu: .1
            memory: 300M
        ports:
          - containerPort: 80
  selector:
    matchLabels:
      app: hello-world
---
apiVersion: v1
kind: Service
metadata:
  name: hello-world
spec:
  type: LoadBalancer
  ports:
  - protocol: TCP
    port: 80
  selector:
    app: hello-world
쿠버네티스에 배포 명령 날리기
kubectl apply -f C:\sample\v2.0\hello-world.yaml
다음과 같이 정상적으로 올라온 파드 , 리플리카셋,디플로이먼트,서비스의 모습을 확인할 수 있다.


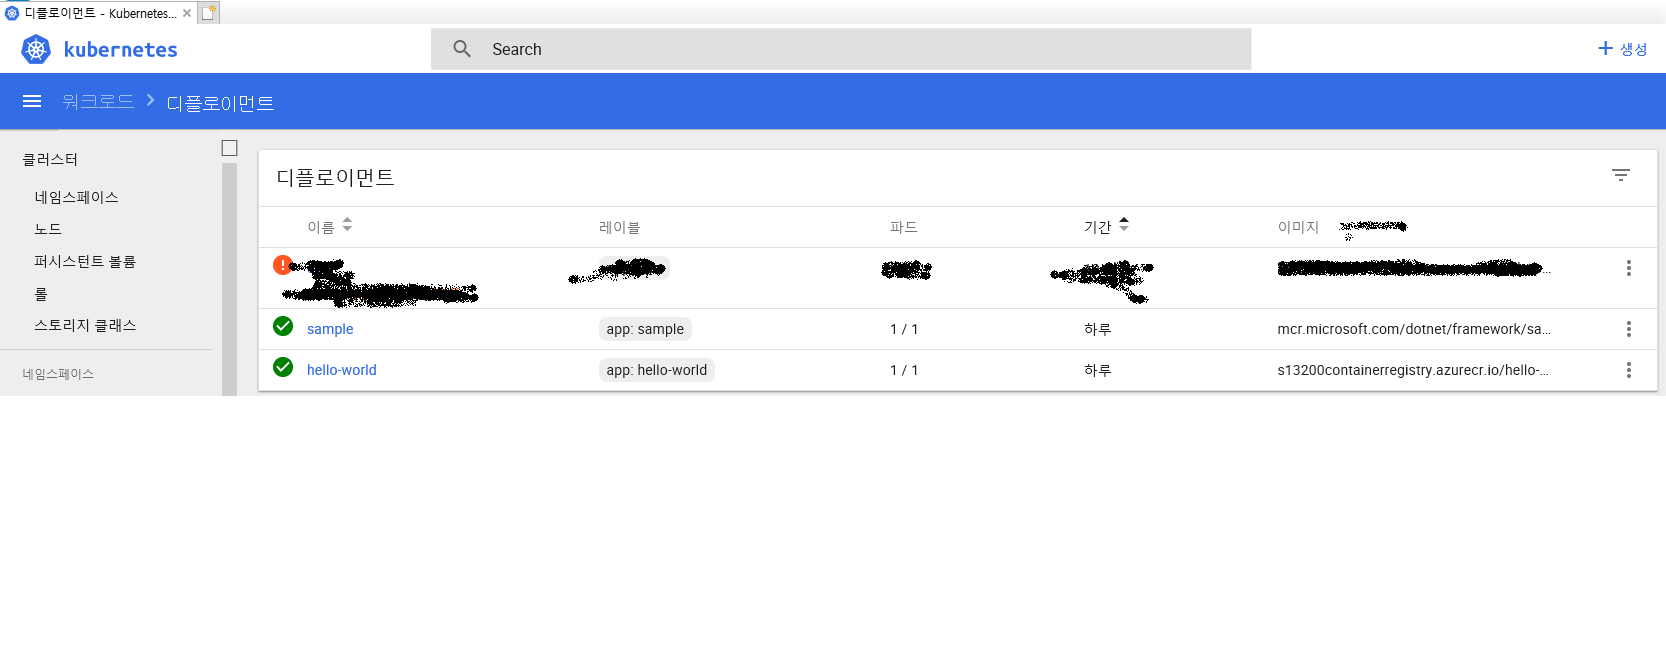
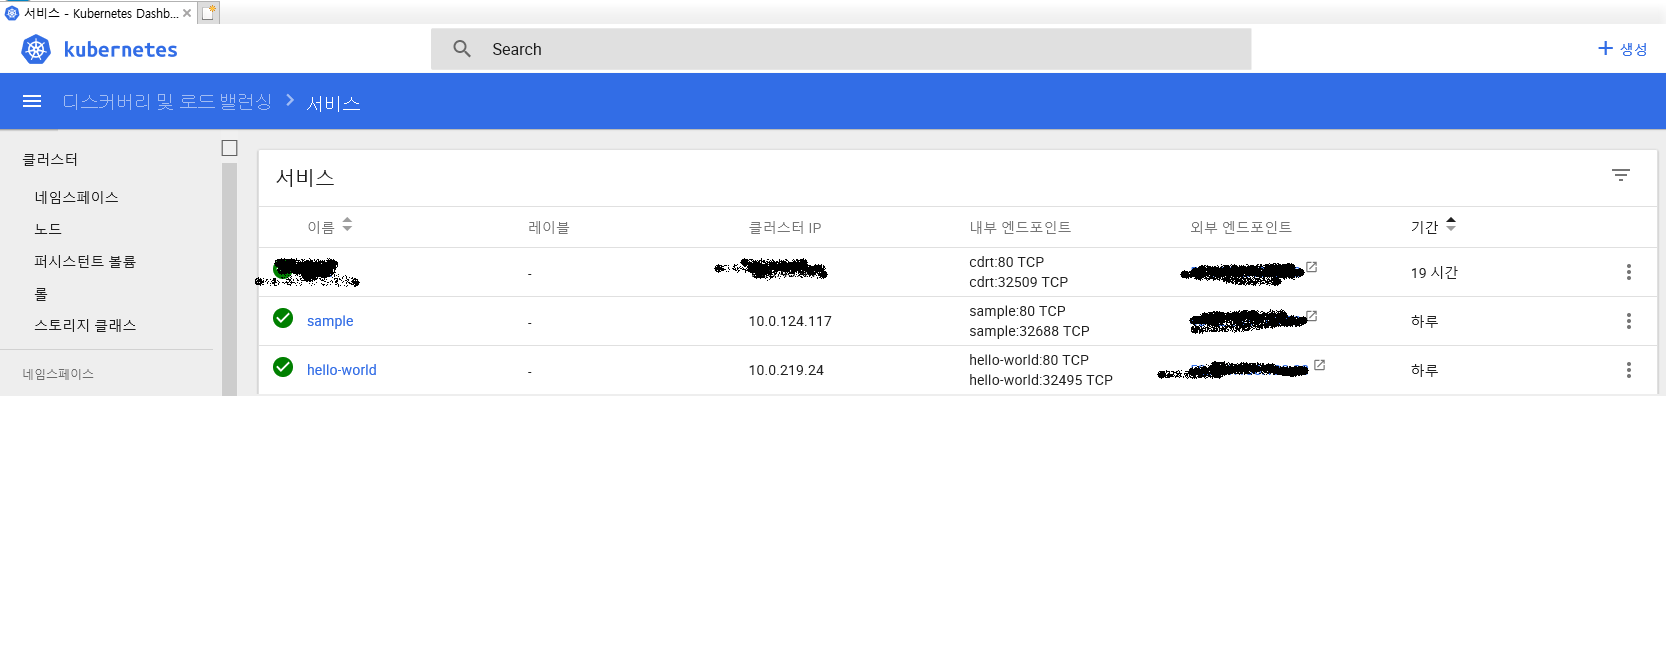
쿠버네티스에서 돌아가는 Hello World 이다. ^^

참고URL
https://docs.microsoft.com/ko-kr/azure/aks/windows-container-cli
https://managedkube.com/kubernetes/pod/failure/crashloopbackoff/k8sbot/troubleshooting/2019/02/12/pod-failure-crashloopbackoff.html
댓글남기기